the link to my groups final project on kinetic typography...done in after effects and flash~!!!
Wednesday, May 18, 2011
Kinetic Typography!!!
the link to my groups final project on kinetice typography...done in after effects and flash~!!!
Saturday, April 16, 2011
Animating the Poster!!! (PART 2)
6.FACES AND TEXT!!!
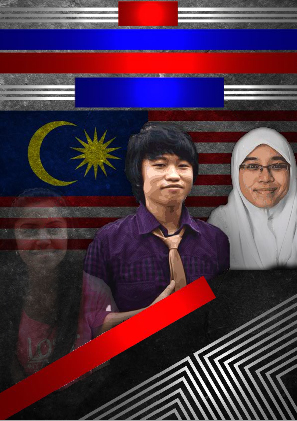
FACES
Convert all the faces into movie clips by select the object,hitting F8 and selecting movie clip.
Apply a similar fade in effect on all three face layers as was done on the flag layer before.
The Malay should fade in from 0% to 100% starting from 6s to 8.4s.
The Chinese fades in next from 6.6s to 8s
Then the Indian from 7.7s to 9s
The fade in should intersect each other as shown below:
TEXT
Create a mask for the texts and animate the mask positions using keyframes.
The masks animate as shown below:

8.PLAYBACK
Hit Ctrl + Enter on your keyboard to playback the animation.

FACES
Convert all the faces into movie clips by select the object,hitting F8 and selecting movie clip.
Apply a similar fade in effect on all three face layers as was done on the flag layer before.
The Malay should fade in from 0% to 100% starting from 6s to 8.4s.
The Chinese fades in next from 6.6s to 8s
Then the Indian from 7.7s to 9s
The fade in should intersect each other as shown below:
| (rememeber to add a classic tween between the keyframes for a smooth transiton between the opacities) |
Below is the result.
 |
| (at 6.6s) |
 |
| (at 7.4s) |
 |
| (at 8s) |
 |
| (at 9s) |
Create a mask for the texts and animate the mask positions using keyframes.
The masks animate as shown below:
 |
| (original position) |
 |
| (at 4.5s) |
 |
| (at 5s) |
 |
| (at 6.8s) |
 |
| (at 8.4s) |
 |
| (at 9s) |
Lock the layers to view the effect.
7.FINAL TOUCHES
Select any frame at 9s (end of animation)
Then go to the Actions panel and within the script editor type stop().

This function prevents your animation from looping when played.
8.PLAYBACK
Hit Ctrl + Enter on your keyboard to playback the animation.

END
Thursday, April 14, 2011
Animating the Poster!!! (PART 1)
I decided to have my poster run for only 9 seconds.So now that we have the poster ready in flash we can start animating.
3.FADE IN EFFECT
Turn off the visibility of each layer apart from the Flag and Background layer.
I then added a keyframes for the Flag layer and background layer at the 8second and 9second frames respectively.

Animating The Flag:
Select the flag and hit F8 to convert it to a movie clip.
I decided to have the flag fade in slowly through my entire animation.By selecting frame 0 of the flag layer
and then going to Properties>Colour Effect>alpha


a) BOTTOM WHITE BANDS
Now create mask layers for the bottom white bands layer.


The timeline for the Bottom white bands should look like this.

Create masks for the layers.
Then create empty keyframes at 0s for the layers.

Create keyframes for the layers at 3.7s
Create rectangular masks and animate using a shape tween to new positions as shown below
Lock the layers to view the masking effect.


Timeline for the lower colour bands

Animation continued in part 2....
3.FADE IN EFFECT
Turn off the visibility of each layer apart from the Flag and Background layer.
I then added a keyframes for the Flag layer and background layer at the 8second and 9second frames respectively.

Animating The Flag:
Select the flag and hit F8 to convert it to a movie clip.
I decided to have the flag fade in slowly through my entire animation.By selecting frame 0 of the flag layer
and then going to Properties>Colour Effect>alpha

Select alpha and drag the slider down to zero.
 |
| (ALPHA frame zero is 0% ALPHA frame eight is 100%) |
Now in order to create a smooth transition to make the flag fade in we creat a classic tween inbetween the two key frames.
To create a classic tween go any where along the timeline inbetween the two frames and Right click>Classic tween

A smooth transitions is now created.Hit 'Enter' on your keyboard to view the transition.
4.MASKING THE BANDS
WHITE BANDS
Toggle the visibilty for the white bands layer on.

a) BOTTOM WHITE BANDS
Now create mask layers for the bottom white bands layer.

Note :Duplicate the layer in order to control two seperate masks at a go
Create empty key frames for the layers at 0s.

With the mask for the bottom band layer selected,go to the 2.4s mark and create two new key frames for the white bands and mask respectively.
Draw a two green shapes like the ones below.Position the shapes off the stage for now.
 |
| (make sure to align the edges of the shape with the two parts of the bottom bands layer) |
Create a key frame at 3s for the mask layer and move the two shapes to a new position as shown below.
 |
| (Right click between the frames and create a shape tween.) |
Now create a mask shape for the duplicate layer at a keyframe at 3s...change the the shape as shown below at 3.4s and then create a shape tween.
 |
| (Shape at 3s) |
 |
| (Shape at 3.4s) |
Lock all the layers to view the masking effect.
 |
| (locked layers) |
 |
| (masking effect) |
b)TOP WHITE BANDS
Create masks for the layers.
Then create empty keyframes at 0s for the layers.

Create keyframes for the layers at 3.7s
Create rectangular masks and animate using a shape tween to new positions as shown below
 |
| (Timeline shows keyframe positions and tweens) |
 |
| (At 3s) |
 |
| (at 4.5s) |
 |
| (at 6.5) |

COLOUR BANDS
Toggle the visibility for the colour bands layer to 'on'.

Create an empty key frame for the top red band at 0s as well as a keyframe at 4.5s so that it appears immediately after the top white bands stop moving.
Have the top blue and red band fly in at different interval by using classic tween between two different key frame positions
 |
| (at 4.5s) |
 |
| (at 5.0s) |
 |
| (at 5.5s) |
Create an empty key frame for the remaining blue band at 0s as well as keyframes at 6.3s and 6.8s.
Position the band at 6.3s and 6.8s as shown below and create a classic tween between the frames.
 |
| (at 6.3s) |
 |
| (at 6.8s) |
Toggle visbility for the bottom colour bands to 'on'

Using rectangular masks for both band,animate the masks so that the bands appear to fly into the poster.

The bands should animate like this:


Timeline for the lower colour bands
Animation continued in part 2....
MOTION POSTER~!!! In FLASH!!!
STORY BOARD:
-pending-
Okay now to the poster!!!
STARTING UP:
First i launch Adobe Flash CS4 by doubleclicking on it's icon on the desktop.
1: IMPORTING THE PSD FILE
To Import the poster psd file into flash.Go to File>Import>Import to Stage or Press Ctrl + R on your keyboard.


Then select the Adobe file you want to import which in this case is the 'One malaysia poster' photoshop file.

Click 'Open' to import the file.
A window prompting how you want to handle the layers of your file will be pop up.
 |
| (I used the above settings) |
The file is then opened up in flash as layers.

2.PREPARING THE FILE
Then go to Window>Properties and change the stage size to 595 X 842 and the Frames per second (fps) to 12.


2.PREPARING THE FILE
Then go to Window>Properties and change the stage size to 595 X 842 and the Frames per second (fps) to 12.

In order to be handle my work much easier i created a group file and placed all layers of my file into the group.I named the group 'Motion Poster'.

Now that the poster is set up let's begin animating it!!! hehehe
Subscribe to:
Comments (Atom)